This is a disney classic that most probably don’t
even remember, I used to love watching this one as a
kid and come to think of it I don’t think any of my
kids have seen it, I think we will be watching it if
I can find it somewhere.
Your DIY craft is going to be a flaming pumpkin,
I would not make just yet. Carve your pumpkin when it
gets close to Halloween and then on Halloween night set it on fire.
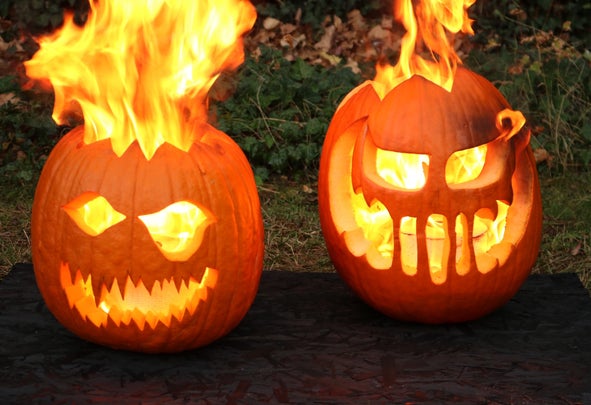
Please be very careful when setting your pumpkin on flames,
you are messing with fire and of course with fire there
is a chance you could get hurt.
What you are going to need:
Pumpkin or Pumpkin(s) 15lbs or larger
Pumpkin carving kit
1 gallon empty metal paint can(s) with lid (s)
Toilet paper roll(s)
Kerosene
Nitrile cleaning gloves
BBQ lighter
Fire extinguisher (class B rating)
Now how to get started:
Gather together your rolls of TP, empty metal paint cans
and kerosene so that you can take them to an open air
environment where you won't be breathing in an excess
of harmful fumes. Then take your 1 gallon empty metal
paint cans and place on or 2 rolls of TP inside each of them.
Make sure that if you are going to place more than one
roll inside each paint can that they do not reach above
the rim because you are going to want to be able to
close the lids later on.
Next, check to make sure you are not around any open
flames or potential ignition sources, then carefully pour
kerosene into the TP rolls until they are completely wet.
Leave a small reservoir of kerosene in the bottom of the
paint can, the TP rolls will soak some of it up while they sit
and saturate. Any additional kerosene still left in the
bottom of the can after saturation may be used for
soaking subsequent rolls later on. It may also be poured
back into a safe kerosene storage container.
Once the TP rolls have been soaked, preferably outside
of your house and away from any open flames or potential
ignition sources, where you can leave your fuel to soak
for 24 hours or until you are ready to use.
Each soaked TP roll will last 45 minutes to an hour.
Next prepare your pumpkin, I'm sure everyone has carved
a pumpkin at least once so I am going to skip the how to.
Important step when ready to light up your pumpkin.
Pick a place that is at least 7-10' away from anything
that could catch fire. Next take a garden hose and
thoroughly wet a 5-7' diameter circle around the location
of where you are going to set your pumpkins a blaze.
Now that everything is prepared it's time to start the show!
Start by bringing the fire extinguisher, paint cans with
fuel, your nitrile gloves and BBQ lighter all over to where
you have placed your pumpkin(s).
Before removing any of the fuel from the paint cans,
put your gloves on. Remove your pumpkin(s) lids and set
them to the side. Then open the fuel canisters and place a
single set of fuel into each pumpkin while being careful not
to spill kerosene on yourself or your grass.
When you are done placing fuel into each pumpkin(s)
remove your gloves and hang to dry. Close the lid on each
paint can and return to where you were storing them.
Double check your grass make sure it is still saturated,
if you need to wet it down again. DO NOT light your pumpkin(s)
from the top as kerosene will start to flame up, instead take
your BBQ lighter and place it at the very bottom of whatever
design you have done. If you are doing more than one
pumpkin wait a few minutes between each one to make
sure everything is running smoothly.
Now take a picture and a video because you are going
to want to capture this.
***There are videos on YouTube on how to do this if
you want to watch a video.***
Graveyard Pudding

I couldn't find any treats to make from the actual movie
but I found these and thought they would be cute and fun.
What you need:
1 package of oreo cookies
1 box of chocolate instant pudding
1 package of PEEPS tombstone
Wilton's candy bones and eyes
zip lock bags
parfait glasses
milk
gummy spider or worm candy
large candy eyes
Create:
Separate the oreo cookies and remove the filling.
Put the oreo cookies into a zip lock bag; seal the bag and
using a rolling pin crush the cookie into small pieces.
Following directions on the back of the box prepare the pudding.
Begin to build the parfait by putting a scoop of crumbled
oreo cookies on the bottom of the glass.
The second layer is a spoonful of chocolate pudding.
The third layer is more crumbled oreo cookies.
Top this off with the tombstone, bones and eyes.
Keep in the fridge until ready to serve.
While you are eating your snack watch Disney's
The Legend of Sleepy Hollow and enjoy!
Comments
Post a Comment